Design patterns play a crucial role in the development of iOS applications, providing a structured and organized approach to building scalable and maintainable code. Two popular design patterns in the iOS ecosystem are Model-View-Controller (MVC) and Model-View-View Model (MVVM). In this blog, we will delve into the characteristics, advantages, and practical examples of both patterns to help developers make informed decisions when choosing the appropriate design pattern for their iOS applications.
MVC is one of the traditional design patterns widely used in iOS development. It divides the application into three interconnected components:
MVC is like the reliable Swiss Army knife for building iOS apps, especially when your project isn’t planning to launch a spaceship. It’s perfect for small to medium-sized projects that don’t have a complicated user interface or a data flow that resembles a rollercoaster. MVC’s strength lies in its clear separation of concerns, making it a great pick for straightforward tasks. Plus, it’s a fantastic starting point for beginners, offering simplicity without the headache. So, if your app is more of a cozy cottage than a sprawling mansion, MVC might just be your design pattern soulmate.
Using MVC in a Swift project involves a simple set of steps. Let’s break it down:
Now, let’s put these steps into action by creating a simple app that displays a list of posts. For this example, we’ll use the free Json placeholder API.
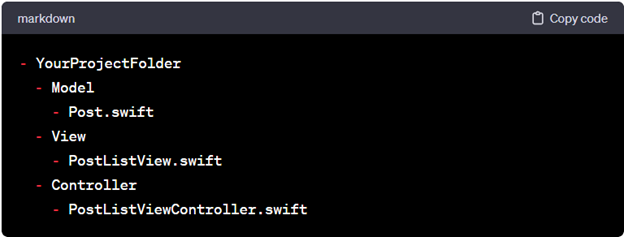
This directory structure helps maintain a clean organization, with models residing in the “Model” folder, views in the “View” folder, and controllers in the “Controller” folder.
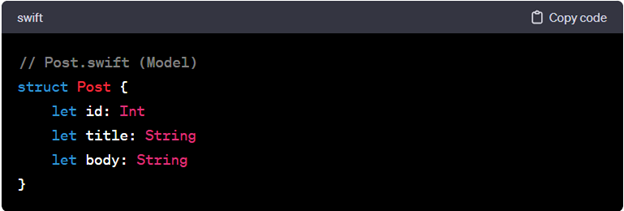
Now, your Post.swift might look something like:
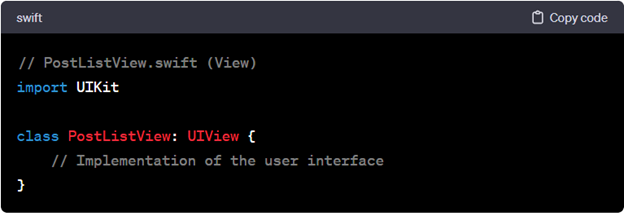
For the view, let’s create PostListView.swift:
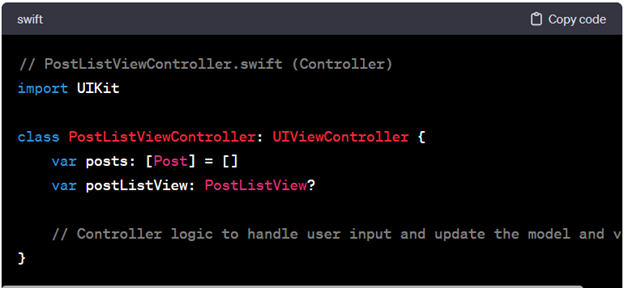
And finally, the controller in PostListViewController.swift:
By following these steps, you’re employing the MVC design pattern in your Swift project, ensuring a structured and maintainable codebase.
Organize your project by placing all UI-related files, including storyboards and xibs, into the “View” folder. For ViewControllers, designate the “Controller” folder. Begin by dragging a UI ViewController onto your canvas and incorporating a TableView. Establish the necessary connections for outlets and create a table view cell, naming it “PostCell.”
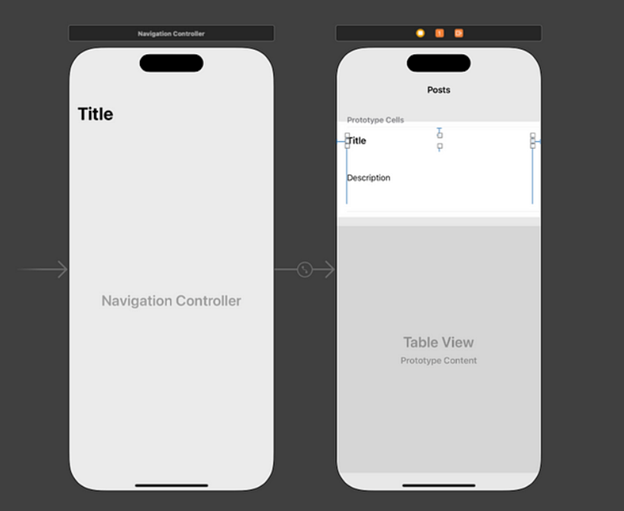
This involves creating a clear structure in your project directory where UI components are neatly housed in the “View” folder, while ViewControllers find their home in the “Controller” folder. Don’t forget to arrange your UI elements, connect the dots with outlets, and bring your TableView to life by defining a customized table view cell, referred to as “PostCell.” This structured approach ensures a more organized and readable project layout.
Let’s consider a simple example of a to-do list application:
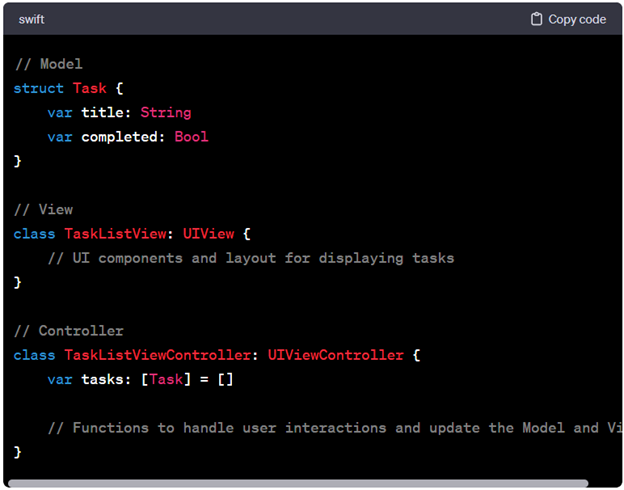
// Model
struct Task {
var title: String
var completed: Bool
}
// View
class TaskListView: UIView {
// UI components and layout for displaying tasks
}
// Controller
class TaskListViewController: UIViewController {
var tasks: [Task] = []
// Functions to handle user interactions and update the Model and View
}
MVVM is a modern design pattern that addresses some of the limitations of MVC, particularly in terms of code separation and testability. MVVM introduces a new component called ViewModel, resulting in the following components:
MVVM shines brightest in larger projects where the user interfaces are intricate and demand a more sophisticated approach. It becomes particularly beneficial when your project involves a substantial amount of unit testing. MVVM’s knack for superior separation of concerns makes it an excellent choice, especially when you need to test the logic within the ViewModel in isolation. If your project is a complex symphony of components, MVVM might be the conductor you’re looking for.
Implementing MVVM in a Swift project involves a series of straightforward steps:
Now, let’s bring this into practice by enhancing our previous example with MVVM. The project directory remains consistent, and our PostListViewModel.swift might look like:
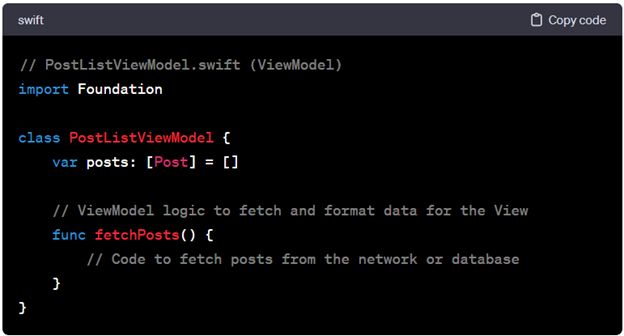
// PostListViewModel.swift (ViewModel)
import Foundation
class PostListViewModel {
var posts: [Post] = []
// ViewModel logic to fetch and format data for the View
func fetchPosts() {
// Code to fetch posts from the network or database
}
}
In MVVM, crafting the Model and Views mirrors the process in MVC. The pivotal addition is the creation of a ViewModel, coupled with establishing a connection between the ViewModel and the controller. Unlike MVC, where the controller directly engages with the model, in MVVM, the controller interacts with the ViewModel, and the ViewModel communicates with the Model.
Let’s streamline this process by creating a “PostVM” file under the “ViewModel” section. Inside this file, introduce a class named “PostVM” and transfer the “postArr” object and the “fetchPosts” method from the viewController. If an Xcode error arises at the line where the table view is reloaded, simply remove that line.
Now that the fetching logic resides in the ViewModel, we need a mechanism to relay information back to the viewController, allowing the table view to reload. To achieve this, let’s create a protocol with two essential methods.
Let’s adapt the to-do list example to MVVM:
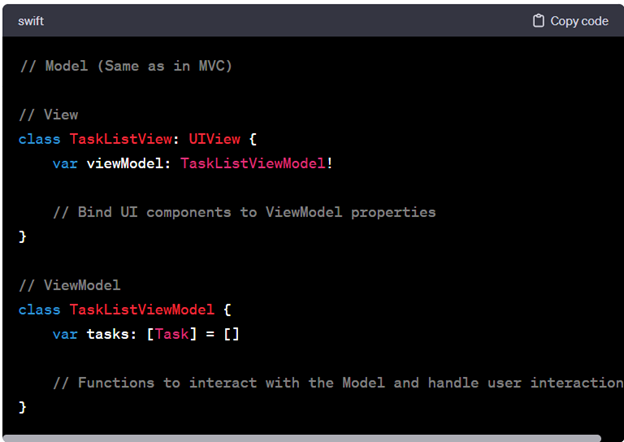
// Model (Same as in MVC)
// View
class TaskListView: UIView {
var viewModel: TaskListViewModel!
// Bind UI components to ViewModel properties
}
// ViewModel
class TaskListViewModel {
var tasks: [Task] = []
// Functions to interact with the Model and handle user interactions
}
Both MVC and MVVM have their merits, and the choice between them depends on the specific needs of your iOS application. Understanding the strengths and weaknesses of each pattern empowers developers to make informed decisions that lead to scalable, maintainable, and efficient code.
Understanding these design patterns is crucial for every iOS developer, as it lays the foundation for building robust, scalable, and maintainable applications. Experiment with both patterns, analyze their pros and cons and choose the one that best fits your project’s needs.
Remember that the best design pattern is the one that fits the unique requirements of your project and team.
Happy coding!
For small projects with straightforward requirements, MVC might be more suitable due to its simplicity and familiarity. MVVM introduces additional components that may be overkill for simple applications.
MVVM is often preferred for larger, more complex projects where testability, maintainability, and code reusability are critical. If your application requires extensive data binding or involves a lot of asynchronous operations, MVVM can offer significant benefits.
Yes, it's possible to mix both patterns in a project. You might adopt MVVM for certain modules or features where its advantages shine while using MVC for simpler sections. However, maintaining consistency is crucial to avoid confusion.
Soft n Solve is here to help! We offer access to a pool of pre-vetted developers, making it easy for you to kickstart your project smoothly!
UAE
Address: Empire Heights, Burj Khalifa Block Business Bay
+971 52 8028863
Pakistan
Address: Anum Estate,Main Shahrah-e-Faisal
+92 331 3223528
Start your 7-days Risk-free trial.
This will close in 0 seconds
| [wpforms id="5045"] |
This will close in 0 seconds